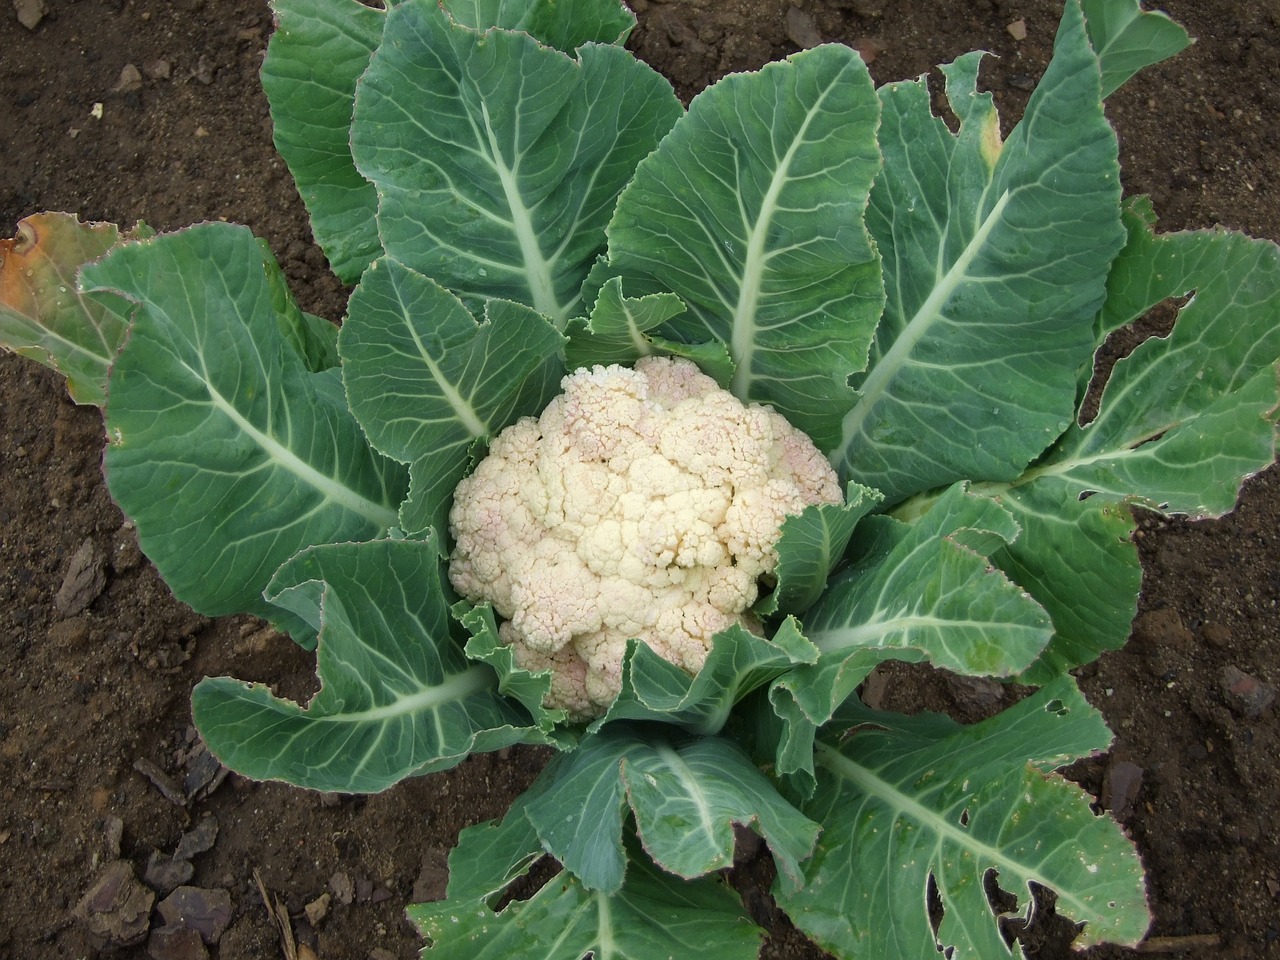
Cauliflower is an easy to grow crop and its flower head, with its tightly clustered florets has a unique and intricate appearance that contributes to the overall visual appeal of a garden.
When cooked, cauliflower takes on the flavors of the ingredients it’s combined with, making it a popular choice for a wide range of dishes. It can be roasted, steamed, boiled, mashed, or even grated to create cauliflower rice. Additionally, cauliflower can be used in both raw and cooked forms, adding texture and flavor to salads, stir-fries, soups, and casseroles.
Here is a complete guide on how to grow and care for Cauliflower:

Description
Cauliflower (Brassica oleracea var. botrytis) is a cool-season biennial vegetable that belongs to the Brassicaceae family, which also includes cabbage, broccoli, and Brussels sprouts.
It is grown as an annual plant for its distinctive white, compact head, that is commonly used in a variety of culinary applications. The edible part of cauliflower is the compact, undeveloped flower head which consists of tightly clustered, immature flower buds and a central stem.
Cauliflower heads come in many colorful variations with white as the most common variety. Other colors include orange, green, and purple.
Cauliflower is low in calories and an excellent source of vitamins C and K. It also provides dietary fiber, folate, vitamin B6, and various minerals.
| Botanical name: Brassica oleracea var. botrytis | Propagation: Seeds |
| Common name: Cauliflower | Soil type: Sandy loam, loam |
| Family: Brassicaceae | Soil pH: 6.0-7.0 |
| Plant type: Biennial, Annual | Temperature: 600F-700F |
| Hardiness zones: USDA zones 2-11 | Light: Full sun |
| Mature size: 12-30in. tall, 12-25in. wide | Spacing: 18-24 inches |
| Flower color: White, orange, green and purple | Pollination: Insects |
| Time to maturity: 75-85 days | |
| Native area: Mediterranean |
Temperature requirements
Cauliflower is a cool-season crop that grows optimally in a temperature range of 600F-700F (150C-210C).
For germination, cauliflower seeds prefer soil temperatures between 70°F and 80°F (21°C to 27°C).
Cauliflower is sensitive to temperature fluctuations and can be stressed by prolonged exposure to temperatures below 50°F (10°C) or above 80°F (27°C). High temperatures can lead to premature bolting (flowering) and affect head development.
Soil requirements
Cauliflower prefers to grow in rich, well-drained soil. Good drainage is important to prevent water logged conditions, which can lead to root rot. Loam or sandy loam soil with a pH of 6.0-7.0 is ideal for growing cauliflower. Maintain a slightly acidic to neutral soil pH for cauliflower, ideally between 6.0 and 7.0.
Cauliflower roots are relatively shallow, so a loose soil texture facilitates root development and allows for easier head expansion. Avoid compacted or heavy soils as they can hinder growth.
Light/Sun requirements
Cauliflower requires full sun for proper growth and head formation. Select an area that receives at least 6-8 hours of sunlight per day.
Cauliflower varieties to Grow
White Varieties: They include Snowball and Self-Blanche.
Colored Varieties: Varieties like Graffiti (purple), Cheddar (orange), and Green Macerata (green) offer colorful options with unique flavors.

When to plant Cauliflower
Spring Planting: Start cauliflower seeds indoors about 6-8 weeks before the last expected frost date in your area. Transplant the seedlings outdoors once they are around 4-6 weeks old and the soil has warmed up a bit. Cauliflower plants prefer cooler temperatures, so make sure to plant them early enough in the spring to mature before the summer heat sets in.
Fall Planting: In regions with mild winters, you can also plant cauliflower in late summer or early fall for a fall harvest. Start seeds indoors about 10-12 weeks before the first expected fall frost date. Transplant the seedlings outdoors when they are around 4-6 weeks old and the temperatures start to cool down.
For an extended harvesting season, plant cauliflower in succession, after every two weeks or ten days.
Garden preparation
Clear the garden area by removing weeds, debris, and any other unwanted vegetation from the chosen planting area. Clearing the space minimizes competition for nutrients and reduces the risk of pests and diseases.
Conduct a soil test to determine the pH level. Cauliflower prefers a slightly acidic to neutral pH (around 6.0 to 7.0). Adjust the pH if necessary using lime for acidic soil or sulfur for alkaline soil.
Use a garden fork or tiller to loosen the soil to a depth of at least 8 to 12 inches. This helps improve aeration and root penetration.
Cauliflower prefers fertile, well-draining soil. Incorporate organic matter such as compost or well-rotted manure into the soil to improve its structure and fertility.
Before planting, incorporate a balanced, slow-release fertilizer into the soil according to the manufacturer’s recommendations. This provides essential nutrients for cauliflower growth.
Starting seeds indoors
Fill trays with a high-quality seed-starting mix and plant cauliflower seeds about ¼ inch deep in the soil.
Water the soil thoroughly after sowing the seeds. Ensure that the soil is consistently moist but not waterlogged.
Cover the seed trays or containers with plastic to create a greenhouse-like environment. This helps retain moisture and promotes germination.
Place the containers in a warm location with indirect sunlight or under grow lights. If using grow lights, keep them about 2 inches above the seedlings.
Once the seedlings have developed a few true leaves and are large enough to handle, transplant them into larger pots or cell packs filled with potting soil.
About 2-3 weeks before the last expected frost date, start hardening off the seedlings by gradually exposing them to outdoor conditions. This helps them acclimatize to the outdoor environment.
Transplanting seedlings
Seedlings are ready for transplanting when they have developed 4-6 true leaves.
Water the cauliflower seedlings well in their indoor containers before transplanting. Moist soil helps minimize stress on the plants during the transition.
Plan to transplant in the late afternoon to minimize stress on the seedlings.
Dig holes in the prepared outdoor bed with enough spacing, about 18 to 24 inches (45 to 60 cm) between plants and 24 to 36 inches (60 to 90 cm) between rows.
Gently remove the cauliflower seedlings from their indoor containers. You can tap the bottom of the containers to loosen the soil or use a small tool to carefully lift them out.
Hold seedlings by their leaves, not the stems, to avoid damaging the delicate stems and roots.
Place each seedling into a prepared hole at the same depth it was growing indoors. Firm the soil around the seedlings to eliminate air pockets.
Water the transplanted seedlings immediately after planting. This helps settle the soil around the roots and reduces transplant shock.
Apply a 2-4inch layer of mulching material around the the seedlings to help retain soil moisture and suppress weeds. This is particularly important for cauliflower, which prefers consistently moist soil.
How to Care for Cauliflower plants
Watering: Keep the soil consistently moist but not waterlogged. Cauliflower requires regular watering, especially during dry periods. Mulching can help retain soil moisture.
Fertilization: Fertilize cauliflower plants with a balanced fertilizer before planting and again when the heads begin to form. Follow package instructions for application rates.
Hilling soil: When cauliflower heads begin to form, consider gently hilling soil around the base of the plants. This helps support the developing heads and prevents discoloration.
Weeding: Keep the cauliflower bed free of weeds to reduce competition for nutrients and water. Be cautious when weeding to avoid damaging the shallow root system.
Blanching heads: To maintain the white color of cauliflower heads, you can practice blanching, which involves tying the outer leaves loosely over the developing head to protect it from sunlight.
Additional tips
Practice crop rotation to minimize the risk of soil-borne diseases and pests.
Choose varieties suited to your specific growing conditions, considering factors such as climate and disease resistance.
To minimize the risk of bolting, choose cauliflower varieties suited to your climate and plant them at the appropriate time. Providing shade during periods of intense heat can also help.
While cauliflower can tolerate cool temperatures, it is sensitive to frost. Provide protection, such as row covers, if frost is expected.
How to Harvest Cauliflower
Cauliflower is ready for harvesting, 75 to 85 days after planting. This is when heads are firm, compact and the curds are tightly closed.
Use a sharp knife to cut cauliflower heads below the curd when they reach the desired size. Avoid damaging the surrounding leaves.
Some cauliflower varieties produce secondary shoots after the main head is harvested. These shoots, often called “side shoots” or “broccolini,” can be harvested for an additional crop.

Companion planting
Best companion plants to plant with cauliflower include garlic, onions, dill, kale, cabbage, spinach, beans, celery, mint, sage, thyme and rosemary.
Worst companion plants include corn, pumpkins, watermelons, strawberries and tomatoes.
Pests and diseases
Cauliflower, like other brassicas, can be susceptible to various pests and diseases. Proper management practices, including regular monitoring and timely intervention, can help prevent and control these issues. Here are some common pests and diseases that can affect cauliflower:
Common Pests
Cabbage Worms: These green caterpillars can chew on leaves and cause significant damage. Handpicking, using row covers, and applying Bacillus thuringiensis (Bt) are effective control methods.
Aphids: Aphids can cluster on the undersides of leaves, sucking plant sap and excreting honeydew. Insecticidal soap or a strong spray of water can help control aphids.
Flea Beetles: These small, jumping beetles can create small holes in leaves. Neem oil, row covers, and insecticidal sprays can be used to manage flea beetle infestations.
Cabbage Root Maggots: The larvae of these flies feed on cauliflower roots, leading to wilting and stunted growth. Use row covers and apply beneficial nematodes to control cabbage root maggots.
Cutworms: Cutworms can cut young seedlings at the base. Use collars around seedlings and practice good garden hygiene to reduce cutworm problems.
Whiteflies: Whiteflies can be found on the undersides of leaves, causing yellowing and wilting. Insecticidal soap or neem oil can help control whitefly populations.
Common Diseases
Downy Mildew: Downy mildew causes yellow patches on leaves, and a grayish mold may develop on the undersides. Provide good air circulation, avoid overhead watering, and use fungicides in case of an infestation.
Clubroot: Clubroot is a soil-borne disease that causes the roots to develop swollen, club-like growths. Rotate crops, use clubroot-resistant varieties, and practice good soil sanitation to manage clubroot.
Black Rot: Black rot affects leaves, causing V-shaped lesions that turn yellow and then brown. Practice crop rotation, remove and destroy infected plants, and use disease-resistant varieties.
Powdery Mildew: Powdery mildew appears as a white, powdery substance on leaves. Provide good air circulation, space plants adequately, and apply fungicides as indicated on the package.
Alternaria Leaf Spot: Alternaria leaf spot causes dark, concentric rings on leaves. Remove and destroy infected leaves, provide good air circulation, and use fungicides as a preventive measure.
Bacterial Soft Rot: Bacterial soft rot causes a foul-smelling decay of plant tissue. Ensure good drainage, avoid overwatering, and remove and destroy infected plants.